Czytaj książkę: «The Joyful Home Cook»


Copyright
HarperCollinsPublishers
1 London Bridge Street
London SE1 9GF
www.harpercollins.co.uk
First published by HarperCollinsPublishers 2019
FIRST EDITION
© Rosie Birkett 2019
Cover layout design © HarperCollinsPublishers 2019
Cover photograph © Helen Cathcart 2019
Food styling: Becks Wilkinson
Prop styling: Linda Berlin
A catalogue record of this book is available from the British Library
Rosie Birkett asserts the moral right to be identified as the author of this work
All rights reserved under International and Pan-American Copyright Conventions. By payment of the required fees, you have been granted the nonexclusive, non-transferable right to access and read the text of this e-book on screen. No part of this text may be reproduced, transmitted, downloaded, decompiled, reverse engineered, or stored in or introduced into any information storage retrieval system, in any form or by any means, whether electronic or mechanical, now known or hereinafter invented, without the express written permission of HarperCollins e-books.
Find out about HarperCollins and the environment at www.harpercollins.co.uk/green
Source ISBN: 9780008314279
Ebook Edition © May 2019 ISBN: 9780008314286
Version 2019-05-20
Dedication
For Chrissy – the original JHC
And for Otis: today’s treasure is creativity

Contents
COVER
TITLE PAGE
COPYRIGHT
DEDICATION
INTRODUCTION
1 Brunch, Lunch and Bites
2 Memorable Mains
3 Special Suppers
4 Sunshine Feasts
5 Fermented, Pickled and Preserved
6 Comfort Cooking
7 Sides
8 Sweet Things
9 Secret Ingredients
INDEX OF SEARCHABLE TERMS
ACKNOWLEDGEMENTS
ABOUT THE PUBLISHER
Introduction
Knowing how to cook and eat well is not only one of life’s most essential and great pleasures, it is a tonic for daily life. Engaging your senses, working with your hands and letting your mind unwind as you gently caramelise onions in butter until they smell so good you’re compelled to eat them straight from the pan: this is the magic of home cooking. And it should be fun, too. Where there’s cooking there’s often – delete as appropriate – lovers/friends/family/kids/dogs/wine/music. There’s discussion and debate, sometimes drama. The kitchen fills with the scent of good food, the windows steam up, the glasses brim, and the warm, fuzzy mess of our lives unfolds over plates of food greedily scraped clean.
Cooking is one of the most enriching and creative things we can do for ourselves and for those we love, and as something that we have to do most days, it should be joyful. For me, that means food prepared with a little thought and care. It could be as simple as a thick slice of homemade toast, soaking with really good butter and topped with a couple of excellent preserved anchovies; or clouds of golden meringue deep with the molasses kick of muscovado sugar. First and foremost, it’s about flavour.
As a food and cookery writer, it’s my job to obsess over food, write about it, create recipes, and I care immensely about every morsel I pop into my greedy, not-so-little mouth and the mouths of those in my vicinity. This book celebrates the possibilities and pleasures that homemade food can bring us when we take the time to prepare and cook good things.
Whether you’re planning a weekend slow-cooking project or have hurriedly squirrelled a few ingredients into your post-work shopping basket, here are recipes to enliven your cooking. Across these pages you’ll find ideas, tips, stories, simple seasonal suggestions and – most importantly – inspiring but achievable recipes that will help you coax the most flavour you possibly can out of everyday ingredients. As well as showing you how to make simple, celebratory springtime lunches, lazy summer picnics, special suppers, comforting soul food and sumptuous seasonal desserts, I want to arm you with fun and satisfying skills that will ultimately help you become a more creative, intuitive and resourceful cook.
I’ve included some gratifying and straightforward DIY techniques that will allow you, should you wish, to be a bit more self-sufficient at home. I show how methods like smoking, curing and brining can bring the best out in meat and fish in recipes like the Cured Smoked Sea Trout (see here) and the Whole Brined, Spatchcocked Barbecue Chicken (see here). You’ll find recipes for flavourful pastries, fresh pasta and slow-fermentation doughs for breads and pizza, that can form the basis of so many fantastic meals, as well as homemade condiments, crispy breadcrumbs and flavoured butters and fresh cheeses that can be adapted throughout the year.
I’ve shared ideas for maximising seasonal produce, from making Wild Garlic Pesto (see here), to preparing quick jams and poached fruit to spruce up your desserts, and preserves like sweet Pickled Peaches (see here), My ‘Kind Of’ Kimchi (see here) and other tangy fermented vegetables and fruit-infused spirits (see here). These flavour-packed foods will help keep your kitchen well stocked throughout the year and add extra ‘wow’ to your dishes. They also make fantastic edible gifts for friends.
And so that these gifts keep on giving, I’ve included plenty of ideas for how to use everything up so nothing is wasted, as well nifty ways of utilising any by-products. Many of the recipes feed into one another, so when you’ve had a go at making the Labneh (see here), you’ll wind up with tangy whey, which you can use to brine the juicy lamb chops (see here). And once you’ve tasted how next-level the parsnips glazed in leftover rhubarb poaching liquor are (see here), you’ll never find yourself pouring it away again. Surplus sourdough starter goes into my squishy, sour crumpets and bright pink beetroot blinis (see here and here). And when you end up with a batch of sourdough crumpets sitting patiently in your freezer, waiting to be defrosted, toasted and slathered with butter, Future You will thank Present You for your efforts.

THE WAY I COOK
As you cook from the book, you will get used to my straightforward, ingredient-led approach; the way I combine, contrast and layer flavours and textures to get the most out of ingredients. You will find repeated flourishes and tricks that I hope will start to run through your cooking: a tang of sharp pickled onion or funk of homemade ferment here, the sweet, juiciness of a thinly sliced sugarsnap pea or crunch of Savoury Granola (see here) there.
I’ve always plumped for the underdog. There’s something for me in rooting for the unloved and underrepresented, which is why in the pages of this book you’re not going to find yet another recipe for roast forerib of beef or chocolate mousse. Instead, I want to introduce or reacquaint you with ingredients you might not have used before, or don’t use that often, but that are readily and easily available, and that can bring so much to your kitchen. Things like buttermilk – once a staple in English cookery – whey, pickled walnuts, fregola and buckwheat: all versatile ingredients worth getting in if you don’t have them already.
I grew up in rural Kent with parents who bordered on obsessive when it came to food and drink: my mother an astonishing home cook, my late father a passionate grower of veg, keen forager and even more voracious eater. My mum’s simple, delicious home-cooked meals were the heartbeat of family life. Eating vegetables that my dad grew himself, and gathering field mushrooms with him on autumn mornings, gave me a precious early insight into the connection between food and the land, and how much flavour is in an ingredient when it’s at its prime. My style of cooking reflects this, often putting seasonal veg at the centre of the plate.
Now I live in a big city, but I never cease to be excited by the arrival of the first green tips of asparagus (to be drenched in spiced butter and tiny brown shrimps as (see here)) in spring, or a late summer glut of ripe tomatoes (to be baked into the galette (see here)), and I’ve given ideas and recipes to encourage this appreciation of seasonality, wherever you live. Connecting to our landscape through our cooking and eating gives a sense of enormous wellbeing, and the food I make is always led by which ingredients are at their freshest and most flavourful, plentiful and affordable. You’ll notice that quite a few ingredients crop up more than once, and will find many ways with seasonal favourites like celeriac, runner and broad beans, beetroot and fennel.
I’m a total allotment novice, and have started growing my own vegetables and herbs with enthusiasm and varying degrees of success, often sharing most of it with the allotment’s rather persistent wildlife. I’m not anywhere near the point where I’m growing enough to live off, but having a go at growing and harvesting my own plants made me value ingredients in a new way. When you harvest even a half-nibbled leaf of vividly earthy chard straight from the ground and notice how much more flavourful it tastes, you realise what goes into producing food and feel more inclined to savour the ingredient. There are a couple of recipes where I’ve name-checked allotment produce (the pasties (see here) and Allotment Greens and Anchovy Orecchiette (see here)), because I thought it might be helpful for you to know what a newbie like me has found easiest to grow and cook with.
If you don’t already, have a go at growing some of your own food, even if you have no outdoor space. Herbs and salad leaves are so easy to grow in a window box or container outside the front or back door, and can bring so much vibrancy to your cooking. From seed, I‘ve successfully grown lovage (if you’re not familiar with it, it has a wonderful spicy, curry leaf-meets-celery flavour and comes back year after year), chervil, tarragon, borage (tastes like cucumber and has gorgeous blue and pink flowers), sage and thyme. Investing in a rosemary plant and bay tree is also helpful. Our bay tree is meagre and dog-eared, often battered by the bin men and attacked by slugs, but it’s still consistently provides enough fresh bay leaves for all my cooking.
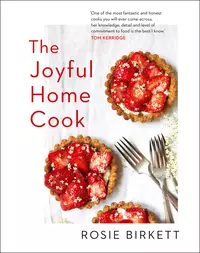
Foraging isn’t just for men in waxed hats who can identify any mushroom at twenty paces. When I walk the dog down the canal, inhaling the heady scent of elderflower in May and June, it’s impossible to resist grabbing fragrant fistfuls for the strawberry tarts on the cover of this book, or to infuse vinegar. On the coast, I’ll look for flowering stems of wild fennel – their golden pollen is like an extra seasoning of intense anise for seafood or juicy, ripe stone fruit. There’s something incredibly exciting about picking wild ingredients, and they bring intense, hyper-local and unique flavours to your cooking. It goes without saying that you should never eat an ingredient if you’re not 100 per cent sure about it.


While fresh seasonal produce forms the backbone of my cooking style, as part of my job I’ve been lucky enough to travel and report on different cuisines, meeting many chefs and food producers around the world. So naturally, a number of enlivening international ingredients have found their way into my cooking and are now firm kitchen staples: things like harissa, tahini, tamarind sauce, pomegranate molasses, fish sauce and grains and pulses such as freekeh and lentils. If some of these ingredients are more unfamiliar or a little harder to source, I promise they will delight and inspire your cooking from here on in, and not just gather dust in the cupboard.
CHERISH THE CRAFT OF COOKING
There is an increasing appetite to understand the craft and processes behind much of the food we love, and I want to demystify techniques like simple sourdough bakery, fermenting, smoking, curing and brining, and making simple homemade fresh cheeses. They are all age-old techniques that have been recently re-embraced by restaurant chefs, but they mostly originated from domestic kitchens, and we are now reconnecting with them as home cooks.
In particular, I’m excited about the fermented recipes. What I love most about the process is that anyone can do it in any home kitchen: you don’t need any fancy kit. It’s as simple as salt, ingredients and patience. That naturally occurring wild yeasts and bacteria we can’t see work together to transform ingredients into something fizzing, tangy and delicious can feel miraculous, and sometimes a little nerve-wracking, but it’s the most natural of processes, and one which we can control. The resulting foods are packed full of good bacteria, making them great for our guts and digestion, and their flavours are quite literally alive and completely revelatory: just wait until you try Fermented Green Chillies (see here), and the tangy spiciness they will add to your pizzas, salads and the addictive cheesy cornbread (see here).


Mastering sourdough at home has been life-changing for me, so I was determined to include a really accessible, straightforward recipe (see here). It’s my failsafe method for a steadfast, tasty bread, and you only need flour, water, a bowl and a lidded, ovenproof pot or casserole dish: no special proving basket is required (though if you have one, of course put it to use). If you’ve never made it before, I can’t wait for you to experience the thrill of cutting the hefty crust of your first loaf of homemade sourdough, to spread with butter while it’s still warm because you’re so impatient.
Home cooking is, by its nature, not about perfection; things can be improved upon, tweaked to suit a person’s palate, or adapted to use up what’s in the fridge or storecupboard and I wholeheartedly encourage this. It’s about thought, care, resourcefulness and creativity, and making these recipes your own. But most of all it’s about slowing down and enjoying the process, learning and gaining confidence, experimenting and taking risks. Sure, sometimes things go a little wrong, but try and be kind to yourself. If homemade pastry rips, patch it up – it will still taste better than anything you could have bought. In my experience of cooking for friends and family at home, and paying guests at my pop-ups, most folk will be a little moved, grateful and happy when you put a plate of something tasty and thoughtfully prepared in front of them.
So often – particularly for women – the conversation around food and eating is an anxious, confusing, shame-filled one, with more of an emphasis on what to deny yourself than what to enjoy. Let’s shift the conversation back to what’s delicious, what’s worth cooking and eating, and how much happiness and satisfaction we can experience by getting to grips with the craft of cooking, spending a bit of time in the kitchen handling – and cooking with – beautiful ingredients. I’m a big believer that more wellbeing can be gained from spending time enjoying the creative process of making food for those you love, and connecting to nature and seasonality through your cooking, than stressing about how many calories are in things.
I hope these recipes will bring joy to your table, your favourite comfy chair, the garden, the beach, your bed – wherever it is you choose to eat them, and with whomever you choose to share them. Life can be tough, chaotic and often unfathomable. So many things are outside of our control, so let’s take the light where we can, and make something good for supper.
A NOTE ON SOURCING
To be able to write a book about the joys of good food, and talk to you from these pages in the intimacy of your home kitchen is a huge privilege, and not something I take lightly. It would feel disingenuous to not address the environmental and ethical implications of our consumer choices as home cooks, and while I don’t want to preach to you (because I am sure you already consider these things), I thought it might be helpful to share some thoughts. To borrow some wise words from the brilliant writer and activist Wendell Berry, ‘eating is an agricultural act’, and it’s important and empowering to understand how the way we shop, cook and eat affects the world around us, as well as our own health. Knowing where our ingredients come from and how they’re produced helps us to make better decisions with a more positive impact, and ultimately make more joyful food.
While I do still enjoy cooking and eating meat, we’re all becoming increasingly aware that the human appetite for meat and dairy is having a hugely destructive impact on our world. Like many people, I’ve massively reduced my meat consumption over the past few years. Both consciously and because my cooking style naturally gravitates towards making the most of seasonal vegetables, grains and pulses, along with sustainable fish and seafood.
I live by the idea that ‘meat is a treat’, so when I buy it I am happy to spend more on something that has been produced in as natural and sustainable a way as possible, and the same goes for dairy, poultry and eggs. The slow-grown, organic chicken you splurge on can be celebrated from its first glorious roasting to the last drop of its golden stock, which will elevate a dish of Wild Garlic Gnocchi (see here), or a warming chicken soup laced with ginger (see here).
Slow-grown animals have a better flavour because they’ve had time to lay down natural fat, and those reared with space to roam and graze, and slaughtered nearer to where they’ve lived are less stressed and therefore taste better, because stress hormones like cortisol and adrenaline present at the time of slaughter have a negative impact on the flavour and nutritional value of the meat. It makes sense that what an animal eats will affect the way it tastes, and animals that graze and forage on grassy, diverse, wildflower-rich pastures have a superior flavour. A great example of this is salt marsh lamb, one of my all-time favourite meats, which has a unique herbaceous flavour and minerality, as it grazes on coastal pastures and estuary salt marshes. Look out for it in June and July. You can read more about pasture-fed farming at www.pastureforlife.org.
It’s worth tracking down a good local butcher or farm shop where you can find out about the provenance of their meat – if you don’t have the luxury of either of these, there are plenty of helpful online resources where you can read more about ethical meat (check out bicbim.co.uk), and some fantastic direct farm-to-table box schemes such as farmdrop.com and greenpasturefarms.co.uk. If the supermarket is your main port of call, look out for RSPCA assured and the organic label. While there are plenty of farmers doing things well without being officially certified as ‘organic’, I do believe in the organic certification as a guarantee that it has been farmed or raised in the most natural way possible – in healthy, fertile soils that promote biodiversity rather than chemical-led monocultures, without routine use of antibiotics or chemical pesticides. It’s a good barometer of quality, animal welfare and care and that means, particularly in the supermarket, that it’s an easy way for us as consumers to make better choices.
You’ll notice that there are plenty of fish and seafood recipes in the book: I wrote much of it on the Kent coast, where my mum lives, and couldn’t help but feel inspired by the incredible haul at the local fishmonger Jenkins & Son. I have tried to use species that are broadly more sustainable and in line with MSC (Marine Stewardship Council) recommendations, but because monitored fish stocks are constantly changing, and vary regionally, talk to your local fishmonger about what’s in season, sustainable and plentiful in your area. Look out for fish that is line-caught, squid caught by jig, and species that are certified with a blue label by the MSC, and try and avoid any fish or seafood that has been trawled – this method of fishing destroys the flora and fauna of the seabed.
I also hope that by including recipes for making your own fresh cheese and butters, I’ll show you that it’s worth investing in fewer, better quality dairy products. Although milk, cream and butter are things we have come to take for granted, they vary greatly in terms of flavour and quality according to how they’ve been produced. Again, plump for organic if you can, and keep an eye out for smaller-scale producers – these guys tend to pour their heart and soul into their animals and their products, and it all comes through in the flavour.